Google Nest
The nest integration allows you to integrate a few supported Google Nest devices in Home Assistant. This integration uses the Smart Device Management API and Google’s Cloud Pubsub to efficiently listen for changes in device state or other events. See Supported Devices for all devices supported by the SDM API.
There is currently support for the following device types within Home Assistant:
Cameras and Doorbells use Automation and Device Triggers for events and a Media Source for capturing media images on supported devices. Other device types like Smoke and CO Alarms or Security systems are not currently supported by the SDM API.
You are in control of the information and capabilities exposed to Home Assistant. You can authorize a single device, multiple devices, or different levels of functionality such as motion events, live streams, for any particular device. The integration is flexible enough to adapt based on what you allow.
The Nest Smart Device Management (SDM) API requires a US$5 fee. Before buying, make sure your device is supported.
Configuration
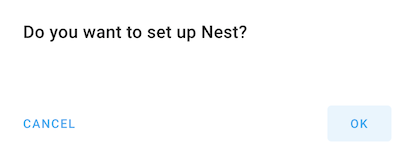
To add the Nest integration to your Home Assistant, use this My Button:

- Browse to your Home Assistant instance.
- Go to Settings > Devices & Services.
- In the bottom right corner, select the Add Integration button.
- From the list, select Nest and follow the instructions on screen.
The integration setup steps will walk you through the process of configuring a Google Cloud Project, Device Access Project, and finally link your account to Home Assistant. Make sure you are running the most recent version of Home Assistant.
By the end of this section you will have a Cloud Project with the necessary APIs enabled
-
Go to the Google Cloud Console.
-
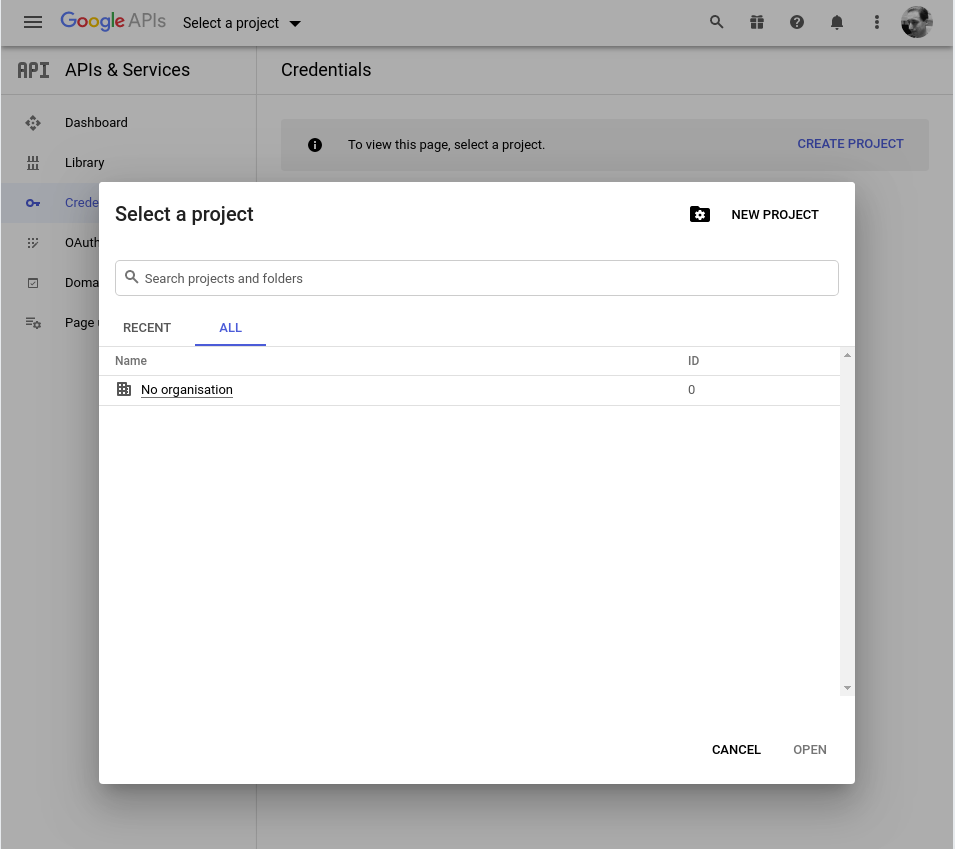
If this is your first time here, you likely need to create a new Google Cloud project. Click Create Project then New Project.
-
Give your Cloud Project a name then click Create.
-
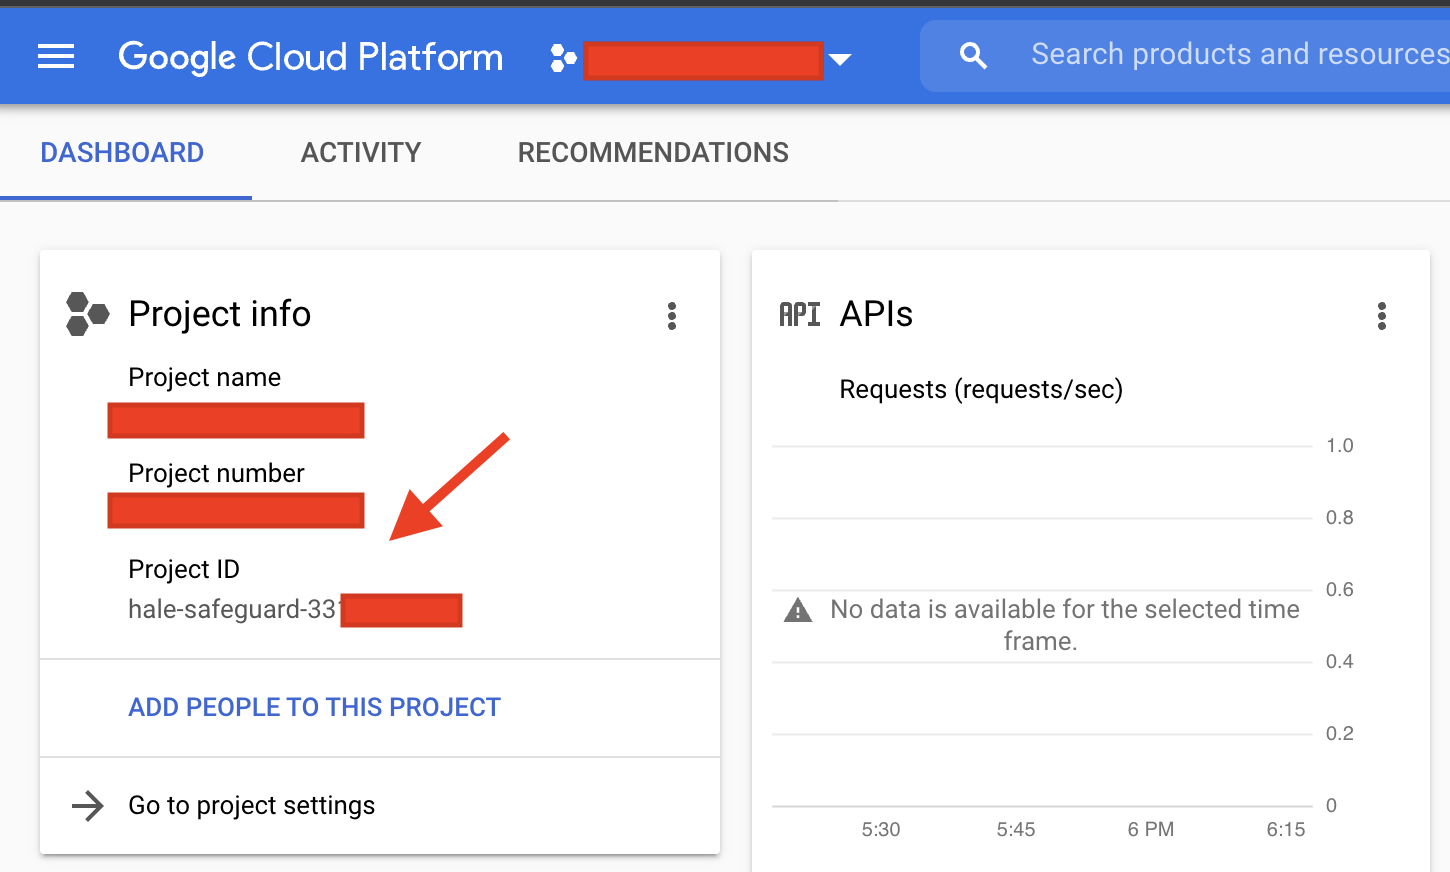
You will need to hold on to your Cloud Project ID to enable a subscription to receive updates from devices. Visit the Cloud Console and copy the Project ID needed by Home Assistant.
-
Go to APIs & Services > Library where you can enable APIs.
-
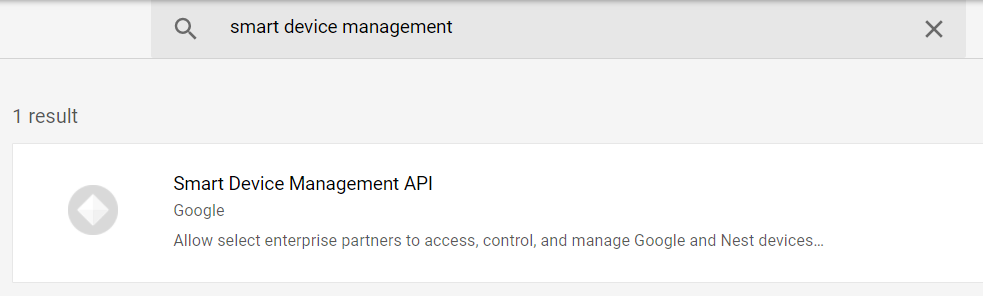
From the API Library search for Smart Device management and click Enable.
-
From the API Library search for Cloud Pub/Sub API in the Cloud Console and click Enable.
You now have a cloud project ready for the next section to configure authentication with OAuth.
By the end of this section you will have configured the OAuth Consent Screen, needed for giving Home Assistant access to your cloud project.
-
Go to the Google API Console.
-
Click OAuth consent screen and configure it.
-
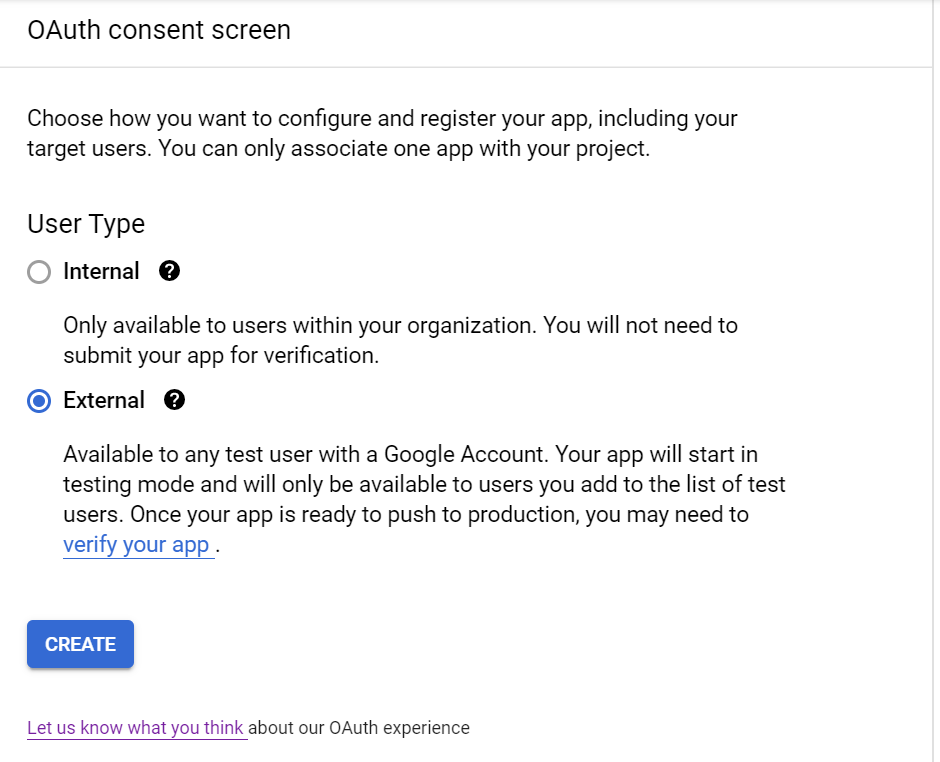
Select External (the only choice if you are not a G-Suite user) then click Create. While you are here, you may click the Let us know what you think to give Google’s OAuth team any feedback about your experience configuring credentials for self-hosted software. They make regular improvements to this flow and appear to value feedback.
-
The App Information screen needs you to enter an App name and User support email, then enter your email again under Developer contact email. These are only shown while you later go through the OAuth flow to authorize Home Assistant to access your account. Click Save and Continue. Omit unnecessary information (e.g. logo) to avoid additional review by Google.
-
On the Scopes step click Save and Continue.
-
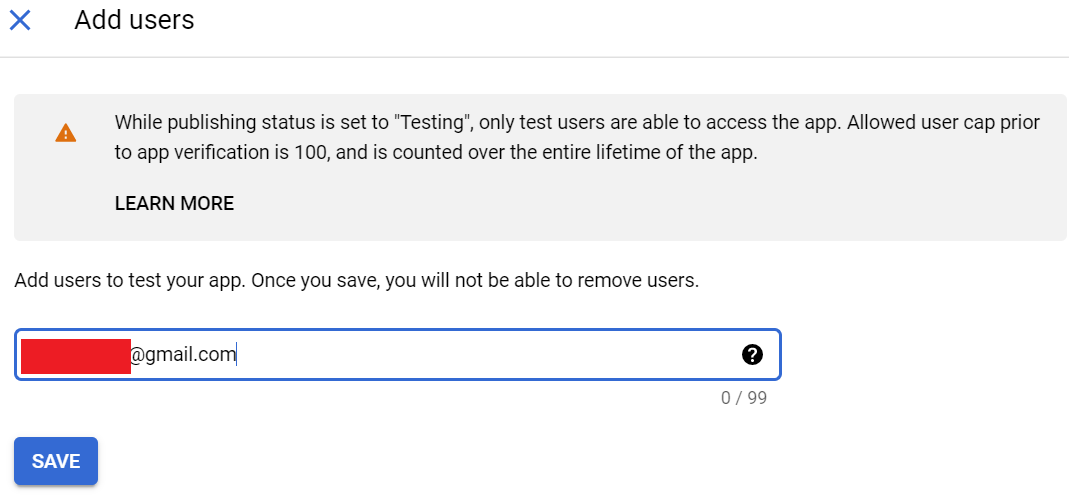
On the Test Users step, you need to add your Google Account (e.g., your @gmail.com address) to the list. Click Save on your test account then Save and Continue to finish the consent flow.
-
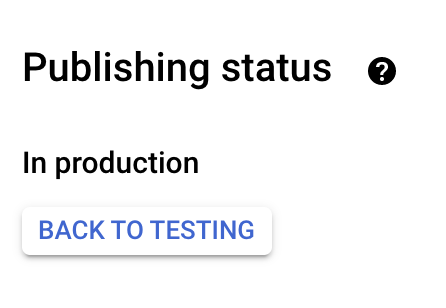
Navigate back to the OAuth consent screen and click Publish App to set the Publishing status is In Production.
-
The warning says your app will be available to any user with a Google Account which refers to the fields you entered on the App Information screen if someone finds the URL. This does not expose your Google Account or Nest data.
-
Make sure the status is not Testing, or you will get logged out every 7 days.
By the end of this section you will have the OAuth Client ID and Client Secret needed for Application Credentials setup.
The steps below use Web Application Auth with My Home Assistant to handle Google’s strict URL validation rules like requiring SSL and a publicly resolvable redirect URL. Desktop Auth has been deprecated by Google to improve security, and it can no longer be used with Home Assistant.
-
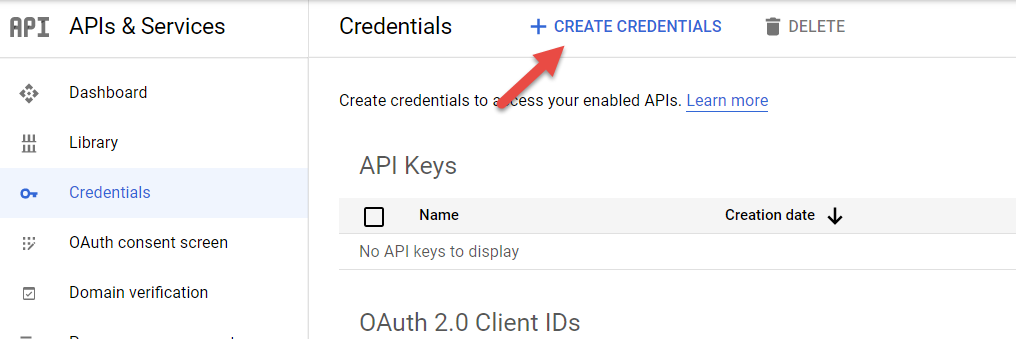
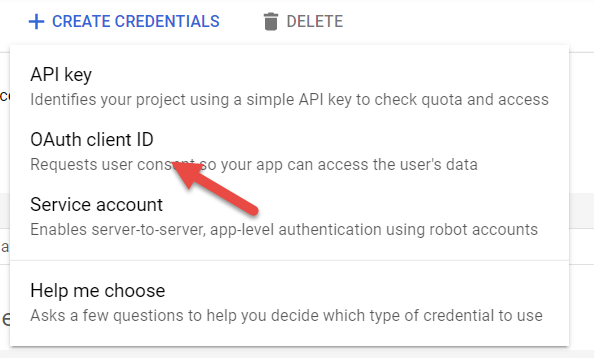
Navigate to the Credentials page and click Create Credentials.
-
From the drop-down list select OAuth client ID.
-
Enter Web Application for the Application type.
-
Pick a name for your credential.
-
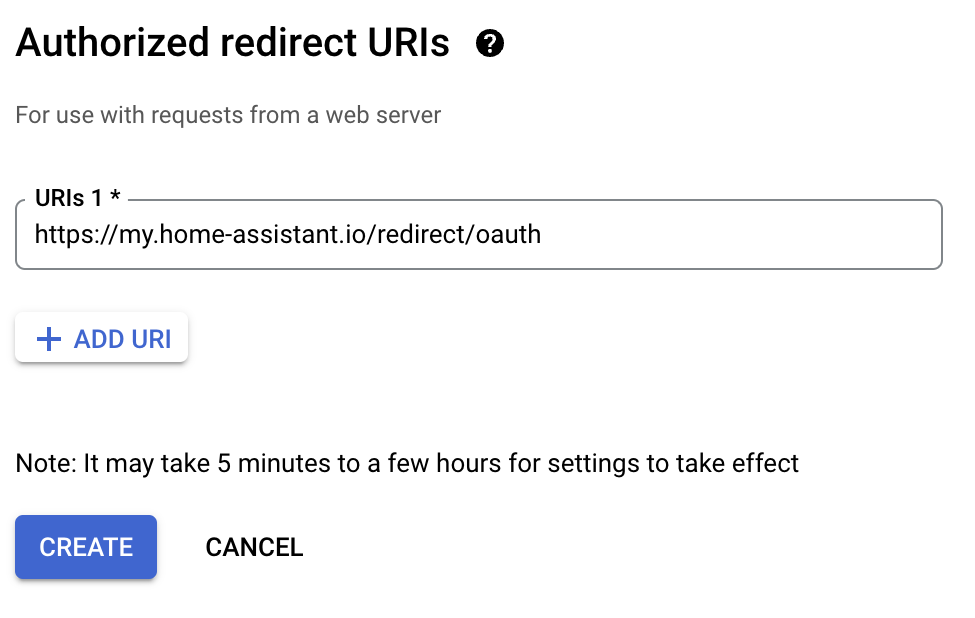
Add Authorized redirect URIs end enter
https://my.home-assistant.io/redirect/oauth -
Click Create to create the credential.
-
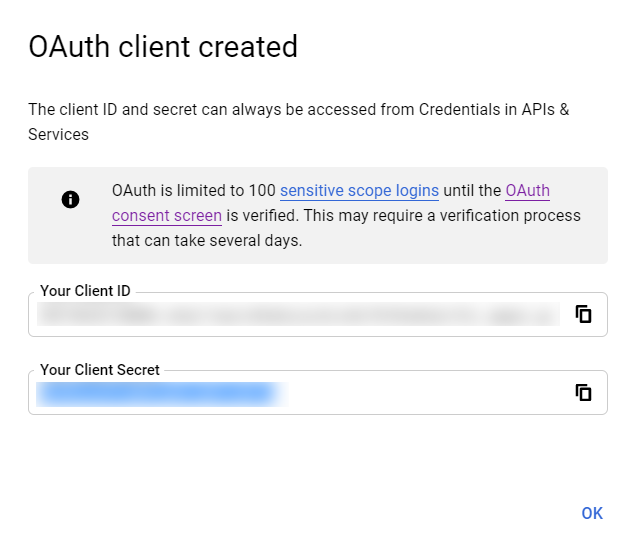
You should now be presented with an OAuth client created message.
-
You now have OAuth Client ID and OAuth Client Secret needed by Home Assistant. See Application Credentials for more general detail about how Home Assistant manages credentials.
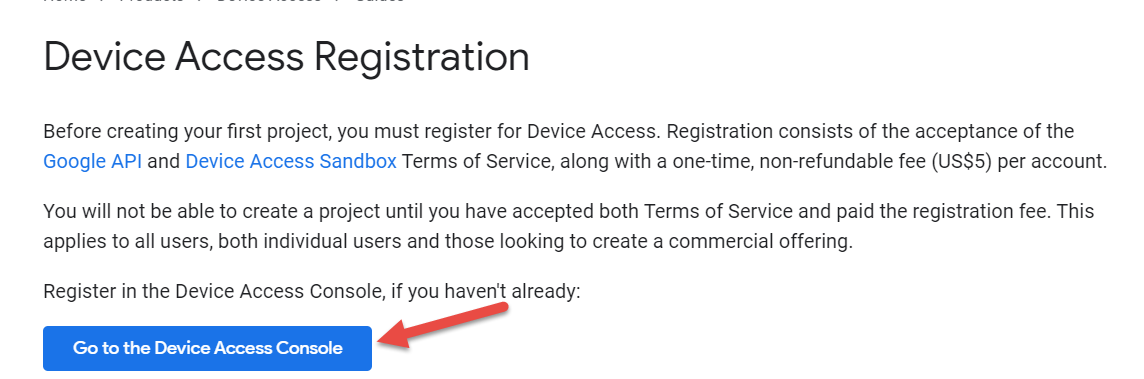
Now that you have authentication configured, you will create a Nest Device Access Project which requires a US$5 fee. Once completed, you will have a Device Access Project ID.
-
Go to the Device Access Registration page. Click on the button Go to the Device Access Console.
-
Check the box to “Accept the Terms of Service” and click Continue to Payment where you need to pay a fee (currently US$5).
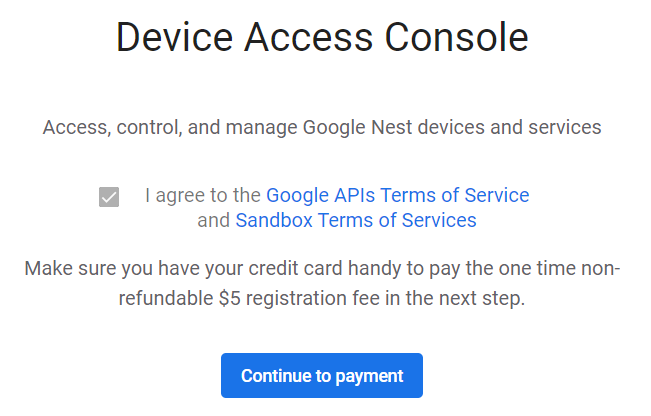 It is currently not possible to share/be invited to a home with a G-Suite account. Make sure that you pay the fee with an account that has access to your devices.
 -
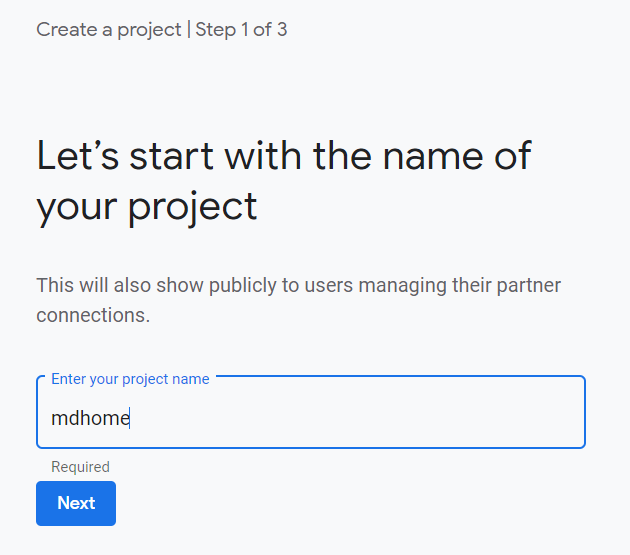
Now the Device Access Console should be visible. Click on Create project.
-
Give your Device Access project a name and click Next.
-
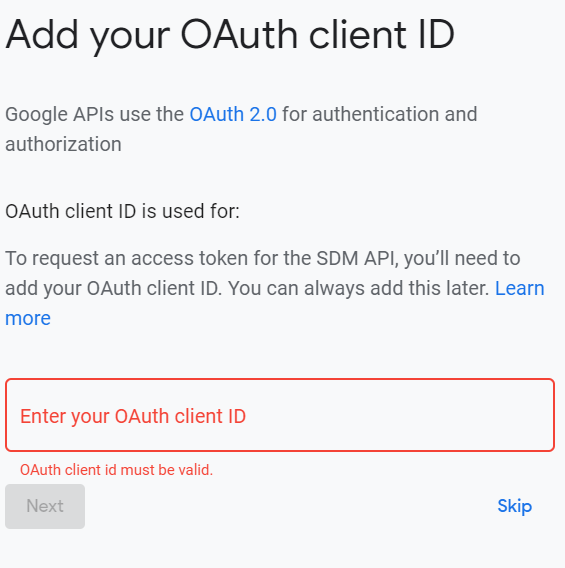
Next you will be asked for an OAuth client ID which you created in the previous step and click Next.
-
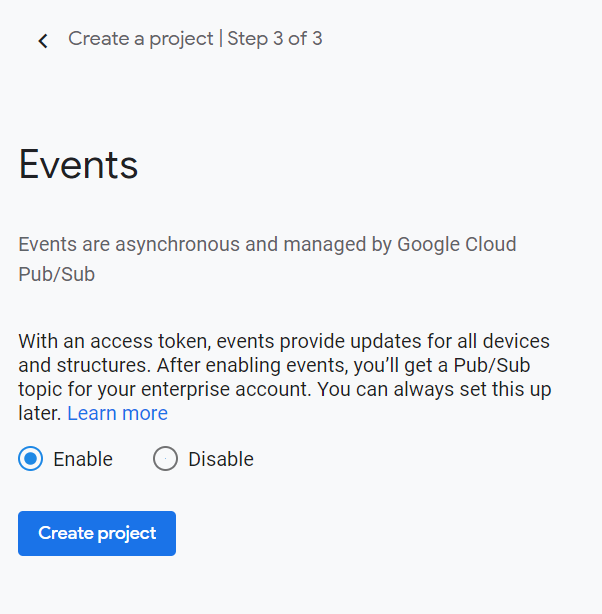
Enable Events by clicking on Enable and Create project.
-
You now have a Device Access Project ID needed by Home Assistant.
In this section you will authorize Home Assistant to access your account by generating an Authentication Token.
See Troubleshooting below for steps to resolve the common misconfigurations that result in errors such as Can’t link… or Error 400 from Google.
Note that OAuth for Apps has been deprecated by Google and will break by October 2022.
-
In Home Assistant, you should already be going through the setup flow. If not, go back and click the My: Add Integration button above to start the setup. The integration will ask you for all of the necessary integration configuration.
-
Once all configuration information is entered in Home Assistant, a new tab opens, allowing you to choose a Google account. This should be the same developer account you configured above.
-
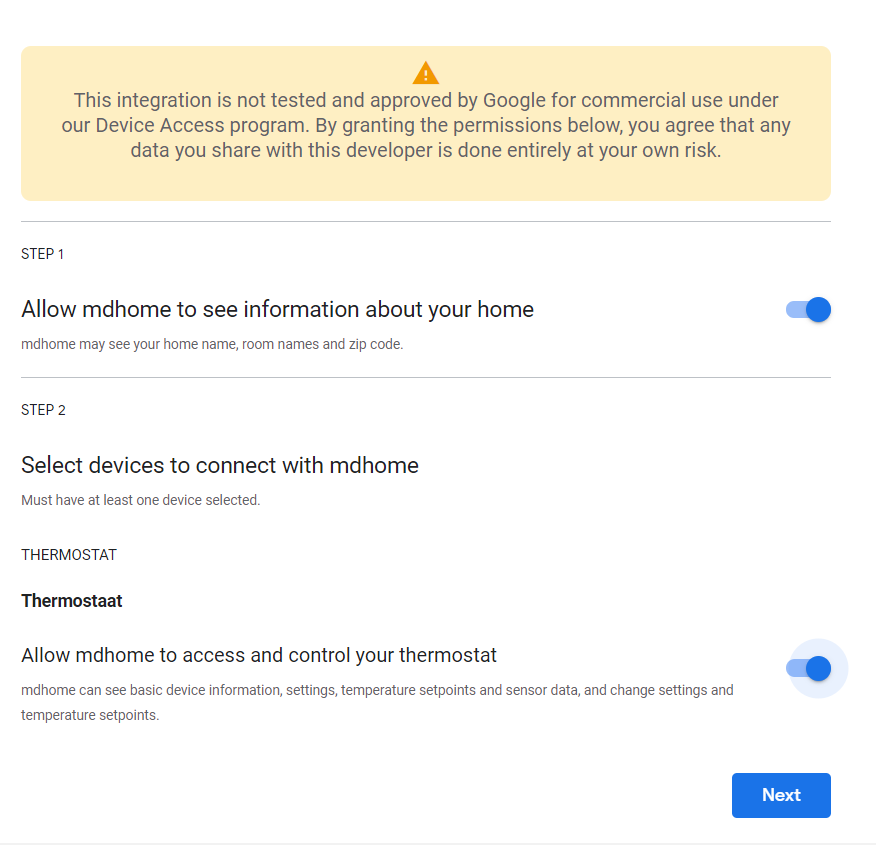
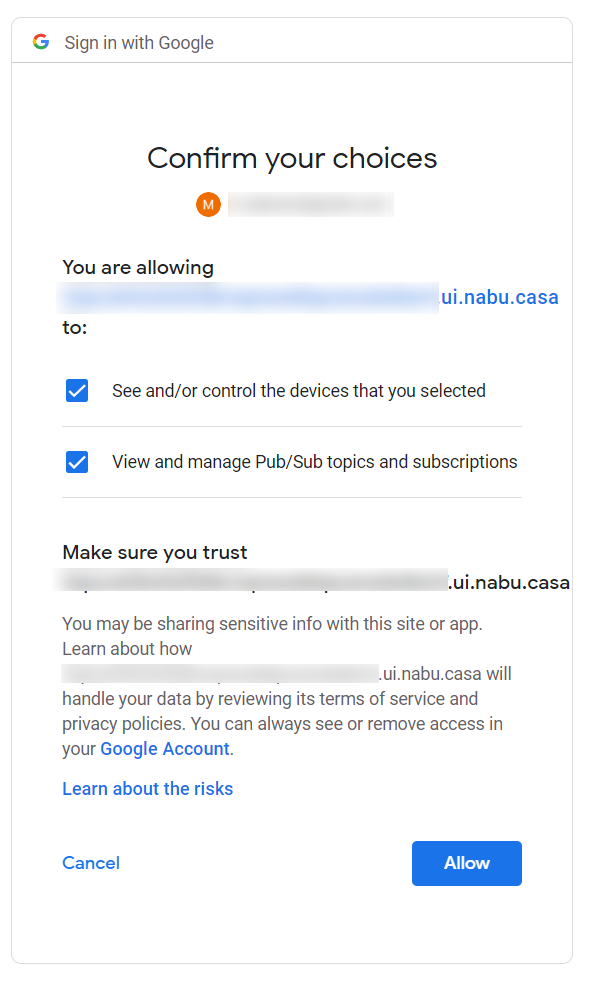
The Google Nest permissions screen will allow you to choose which devices to configure and lets you select devices from multiple homes. You likely want to enable everything, however, you can leave out any feature you do not wish to use with Home Assistant.
-
You will get redirected to another account selection page.
-
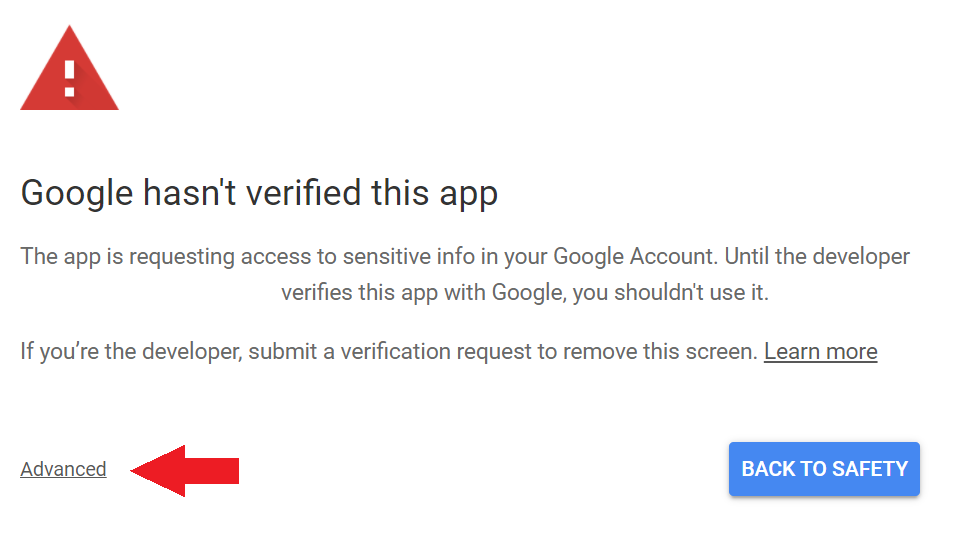
You may see a warning screen that says Google hasn’t verified this app since you just set up an un-verified developer workflow. Click Continue to proceed.
-
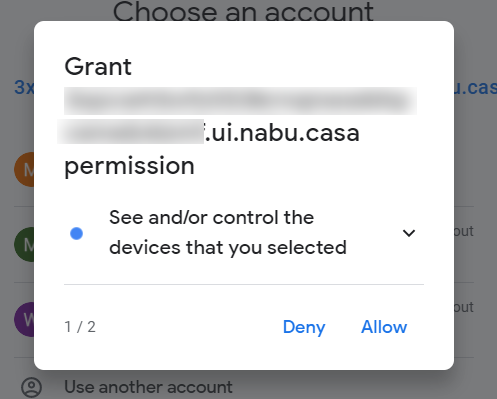
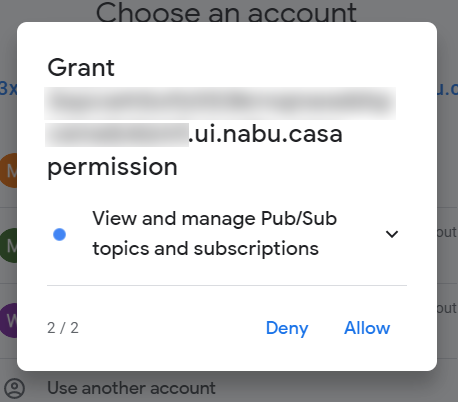
Then you will be asked to grant access to additional permissions. Click Allow.
-
Confirm you want to allow persistent access to Home Assistant.
-
You will now see a page hosted by My Home Assistant asking if you would like to Link account to Home Assistant? Click Link Account to continue.
-
If all went well, you are ready to go!
Climate
All Google Nest Thermostat models are exposed as a climate entity that use the Thermostat Traits in the SDM API. State changes to the thermostat are reported to Home Assistant through the Cloud Pubsub subscriber.
Given a thermostat named Upstairs then the climate entity is created with a name such as climate.upstairs
This feature is enabled by the following permissions:
- Allow Home Assistant to access and control your thermostat
Sensor
All Google Nest Thermostat models have traits exposed from the SDM API. The initial values of the sensors are fetched on startup, then updated regularly using the Cloud Pubsub subscriber. The following traits are supported with sensors:
Given a thermostat named Upstairs then sensors are created with names such as sensor.upstairs_temperature or sensor.upstairs_humidity.
This feature is enabled by the following permissions:
- Allow Home Assistant to access and control your thermostat
Camera
Home Assistant supports all SDM API features. However, every Camera or Doorbell device has a different set of built-in capabilities. A Camera device has one of the following live stream types:
-
RTSP: These devices have an HLS stream served by the Home Assistant Core. These cameras support server-side
cameraservices like stream recording or image preview. See Low Latency HLS as a great option to enable to reduce stream latency. -
WebRTC: These devices support direct browser to camera communication and a super low latency stream. A Picture Glance Card can show the live stream in the grid with the Camera View set to
live(not recommended for battery-powered cameras).cameraservices like stream recording are not supported.
This feature is enabled by the following permissions:
- Allow Home Assistant to see and display your camera’s livestream
- Other permissions in the Nest or Google Home apps.
All cameras have motion and person triggers, however only some support capturing snapshots for events. The table below summarizes the Supported SDM API features for each device.
| Device | Live Stream | Triggers / Events | Media Source for Triggers / Events |
|---|---|---|---|
| Nest Cam (indoor, wired) Nest Cam (outdoor, battery) |
WebRTC | Motion Person |
N/A |
| Nest Cam Indoor Nest Cam IQ Indoor Nest Cam IQ Outdoor Nest Cam Outdoor |
RTSP Recording |
Motion Person Sound |
Snapshot (jpg) |
| Nest Cam with floodlight | WebRTC | Motion Person |
N/A |
| Nest Doorbell (battery) | WebRTC | Motion Person Chime |
Clip Preview (mp4, gif) |
| Nest Doorbell (wired, 1st gen) | RTSP Recording |
Motion Person Sound Chime |
Snapshot (jpg) |
| Nest Doorbell (wired, 2nd gen) | WebRTC | Motion Person Chime |
Clip Preview (mp4, gif) |
| Nest Hub Max | RTSP Recording |
Motion Person Sound |
Snapshot (jpg) |
Given a camera named Front Yard then the camera is created with a name such as camera.front_yard.
Automation and Device Triggers
The Nest integration provides device triggers to enable automation in Home Assistant. You should review the Automating Home Assistant getting started guide on automations or the Automation documentation for full details.


This is an example of what the nest_event payload looks like for a Device Trigger that you can use to power automations.
{
    "event_type": "nest_event",
    "data": {
        "device_id": "EXAMPLE_DEVICE_ID",
        "type": "doorbell_chime",
        "timestamp": "2022-01-26T04:56:54.031000+00:00",
        "nest_event_id": "EXAMPLE_EVENT_ID",
        "zones": ["Zone 1"],
    },
}
-
device_id: The Home Assistant device identifier for the camera -
nest_event_id: is an opaque identifier that can be used with the Media Source Attachments described below for supported cameras. -
zones: Zones triggering the event if available. Zones are configured in the Google Home App, though not supported by all cameras. Events in the area outside of a named zone will be an empty zone name.
Continue reading below to Media Source Attachments to see how to use media with notification actions.
This feature is enabled by the following permissions:
- Allow Home Assistant to know when there’s a camera event
- Allow Home Assistant to know when there’s a doorbell event
- Other permissions in the Nest or Google Home apps.
Media Source
The Nest Media Source platform allows you to browse clips for recent camera events. Home Assistant is not intended to be a Network Video Recorder (NVR) platform, however, basic support for capturing recent events is supported.
The table above describes which devices support event image snapshots or 10-frame mp4 video clips for recent events.
Media Attachments
The Media Source APIs can be used in Companion App Attachments for Notifications as actions for Device Triggers above like Doorbell Pressed. You will need to be familiar with both the Media Sources supported for your camera, as well as the media capabilities of the companion apps.
-
/api/nest/event_media/DEVICE_ID/EVENT_ID: Media for the event, which supports image snapshots (jpg) or clip previews (mp4) depending on the camera type. -
/api/nest/event_media/DEVICE_ID/EVENT_ID/thumbnail: A thumbnail preview of the media, which supports image snapshots (jpg) or clip previews (gif) depending on the camera type.
You can use the event payload fields device_id and event_id in an automation to send a notification from an actions as shown in the examples below.
Example for cameras that support Clip Previews used with iOS which can render video in notifications.
service: notify.mobile_app_iphone
data:
  message: Doorbell Pressed
  title: Someone pressed the doorbell
  data:
    image: >-
      /api/nest/event_media/{{ trigger.event.data.device_id }}/{{ trigger.event.data.nest_event_id }}/thumbnail
    video: >-
      /api/nest/event_media/{{ trigger.event.data.device_id }}/{{ trigger.event.data.nest_event_id  }}
mode: single
Example for cameras that support Clip Previews, but transcoded to an animated gif (Android does not render video notifications).
service: notify.mobile_app_android
data:
  message: Doorbell Pressed
  title: Someone pressed the doorbell
  data:
    image: >-
      /api/nest/event_media/{{ trigger.event.data.device_id }}/{{ trigger.event.data.nest_event_id }}/thumbnail
Example for cameras that support Snapshot (jpg) on either Android or iOS.
service: notify.mobile_app
data:
  message: Doorbell Pressed
  title: Someone pressed the doorbell
  data:
    image: >-
      /api/nest/event_media/{{ trigger.event.data.device_id }}/{{ trigger.event.data.nest_event_id }}/thumbnail
This feature is enabled by the following permissions:
- Based on the events you’ve selected to share from this device, allow Home Assistant to access camera video clips
- Based on the events you’ve selected to share from this device, allow Home Assistant to access camera snapshots
- Other permissions in the Nest or Google Home apps.
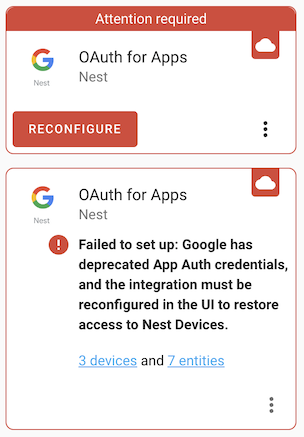
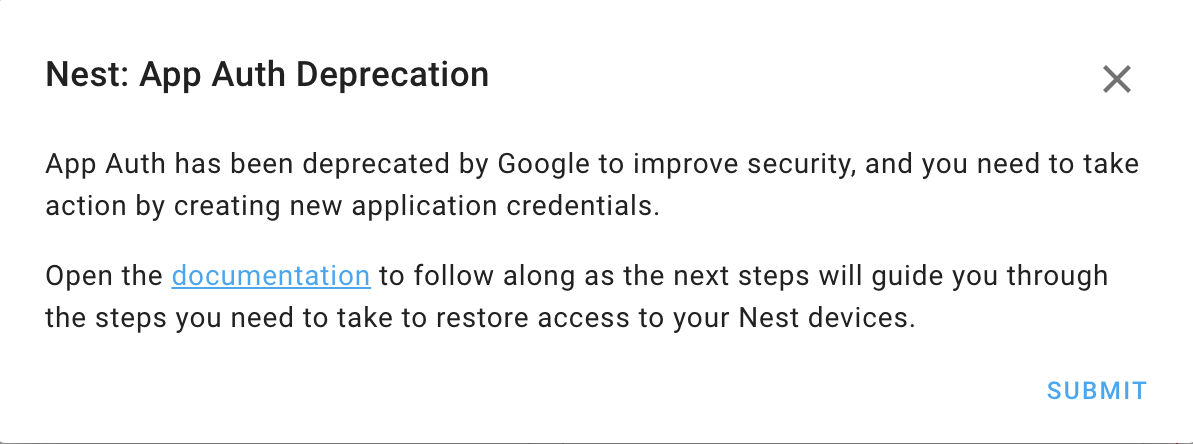
Deprecated App Auth Credentials
To improve security and reduce phishing risk Google has deprecated a previous authentication method used by Home Assistant. This requires action by you to resolve if you previously configured Nest using App Auth.
-
Make sure to upgrade to the latest version of Home Assistant.
-
The Nest integration should appear with alert.
-
Click Reconfigure.
If the Nest integration does not have an Alert then you probably used Web Auth and have nothing to do.
- In the Home Assistant flow confirm your Google Cloud Project ID and proceed to the next step.
- You will be prompted to enter new Application Credentials.
- In another tab visit the Google Cloud Console
- On the Credentials page click Create Credential.
- From the drop-down list select OAuth client ID.
- Enter Web Application for the Application type.
- Pick a new name for your credential.
- Add Authorized redirect URIs end enter
https://my.home-assistant.io/redirect/oauth - Click Create to create the credential.
- You now have OAuth Client ID and OAuth Client Secret needed by Home Assistant.
- Back in Home Assistant, you should now be prompted to create Application Credentials where you will enter the Client ID and Client Secret.
- Visit the Device Access Console
- Select the Device Access Project used by Home Assistant
- You need to then delete the old OAuth Client ID by clicking the Trash icon to unlink your Nest project from the deprecated Auth method.
- Click the overflow menu
...then Add Client ID - Enter the new OAuth Client ID for Web App Auth credentials
- Back in Home Assistant confirm your Device Access Project ID
Once you have completed the above steps, you can continue through the flow to re-authorize Home Assistant to restore access to your Nest Devices.
Troubleshooting
-
You can manage devices and permissions granted to Home Assistant in the Nest Partner Connections Manager. Restart Home Assistant to make new devices available. See the SDM API Troubleshooting documentation for more details.
-
Error 400: invalid_request plus a message about not complying with Google’s OAuth Policy for keeping accounts secure is shown when using App Auth or Desktop Auth or OOB Auth which has been deprecated by Google. Follow the steps in the previous section to upgrade Home Assistant and restore access.
-
Error 400: redirect_uri_mismatch means that your OAuth Client ID is not configured to match the My Home Assistant callback URL. Home Assistant’s redirect URL behavior may have changed since you initially set this up!
-
This should show the redirect URI
https://my.home-assistant.io/redirect/oauthin the error message. If the error message has a different URL, then you are running an older version of Home Assistant need to upgrade or manually disabled My Home Assistant (see below).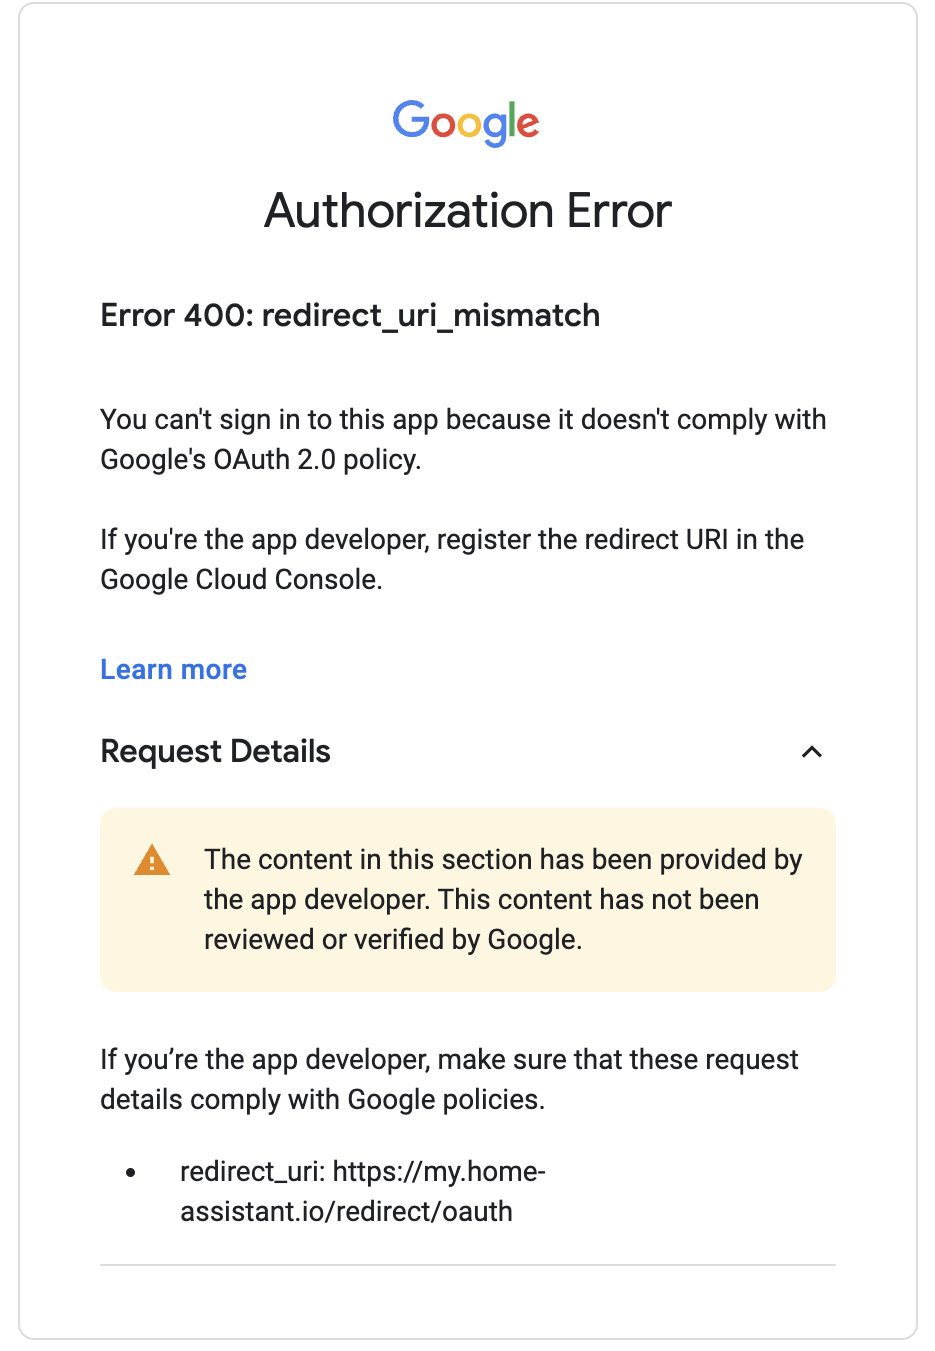
-
Go back to the API Console and select your OAuth 2.0 Client ID.
-
Add the URL
https://my.home-assistant.io/redirect/oauthto the list of Authorized redirect URIs and click Save and start the flow over.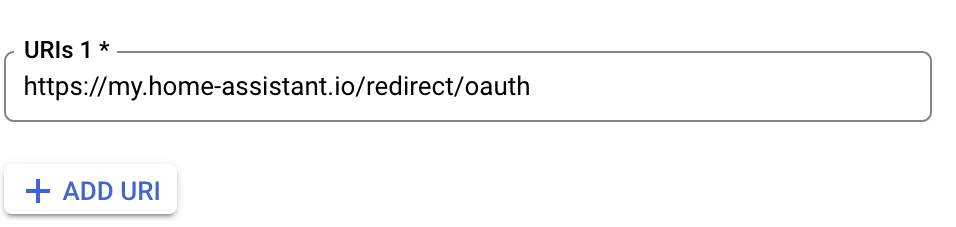
Google applies strict Redirect URI validation rules to keep your login credentials secure. In practice, this means that you must access Home Assistant over SSL and a public top-level domain. See the documentation on Securing and note that you don’t actually need to enable remote access.
If you don’t have My Home Assistant on your installation,
you can use <HOME_ASSISTANT_URL>/auth/external/callback as the redirect URI
instead.
The <HOME_ASSISTANT_URL> must be the same as used during the configuration/
authentication process.
-
Something went wrong: Please contact the developer of this app if the issue persists: This typically means you are using the wrong type of credential (e.g. Desktop Auth). Make sure the credential in the Google Cloud Console is a Web Application credential following the instructions above.
-
Can’t link to [Project Name]: Please contact [Project Name] if the issue persists: This typically means that the OAuth Client ID used is mismatched
The OAuth Client ID used must be consistent, so check these:
-
Google Cloud Console - See instructions above to create new Web Auth OAuth Credentials if needed
-
Device Access Project - The OAuth Client ID for your Device Access Project must refer to the Web Auth OAuth Client ID in the Google Cloud Console
-
Make sure you are using the same Google Account in the Device Access Console and Google Cloud Console e.g. double-check the photo and account name in the top right of the screen
-
Application Credentials - Home Assistant needs to be configured with the same credentials. Delete any existing entries if they do not match, then either manually enter or re-enter as part of the setup.

- Reauthentication required often: If you are getting logged out every 7 days, this means an OAuth Consent Screen misconfiguration or your authentication token was revoked by Google for some other reason.
- This most likely reason is the OAuth Consent Screen is set to Testing by default which expires the token after 7 days.
- Follow the steps above to set it to Production to resolve this and reauthorize your integration one more time to get a new token.
- You may also see this as the error message invalid_grant: Token has been expired or revoked.
- See Google Identity: Refresh token expiration for more reasons on why your token may have expired.
-
Check Settings -> System -> Logs to see if there are any error messages or misconfigurations then see the error messages below.
-
Thermostat does not appear or is unavailable happens due to a bug where the SDM API does return the devices. A common fix get the API to work again is to:
- Restart the Thermostat device. See How to restart or reset a Nest thermostat for more details.
- In the official Nest app or on https://home.nest.com: Move the Thermostat to a different or fake/temporary room.
- Reload the integration in Home Assistant: Navigate to Configuration then Devices & Services, click
...next to Nest and choose Reload.
-
No devices or entities are created if the SDM API is not returning any devices for the authorized account. Double-check that GCP is configured correctly to Enable the API and authorize at least one device in the OAuth setup flow. If you have trouble here, then you may want to walk through the Google instructions and issue commands directly against the API until you successfully get back the devices.
-
Error 403: access_denied means that you need to visit the OAuth Consent Screen and add your Google Account as a Test User.
-
Error: invalid_client no application name means the OAuth Consent Screen has not been fully configured for the project. Enter the required fields (App Name, Support Email, Developer Email) and leave everything else as default.
-
Subscriber error means that
configuration.yamlhas an incorrectsubscriber_idor the subscription is misconfigured. It is recommended to delete this from the configuration, then delete and re-add the integration to let it create a subscription for you. -
Not receiving updates typically means a problem with the subscriber configuration. Make sure to check the logs for any error messages. Changes for things like sensors or thermostat temperature set points should be instantly published to a topic and received by the Home Assistant subscriber when everything is configured correctly.
-
You can see stats about your subscriber in the Cloud Console which includes counts of messages published by your devices, and how many have been acknowledged by your Home Assistant subscriber. You can also
View Messagesto see examples of published. Many old unacknowledged messages indicate the subscriber is not receiving the messages and working properly or not connected at all. -
To aid in diagnosing subscriber problems or camera stream issues it may help to turn up verbose logging by adding some or all of these to your
configuration.yamldepending on where you are having trouble:
logger:
  default: info
  logs:
    homeassistant.components.nest: debug
    homeassistant.components.nest.climate_sdm: debug
    homeassistant.components.nest.camera_sdm: debug
    homeassistant.components.nest.sensor_sdm: debug
    homeassistant.helpers.config_entry_flow: debug
    homeassistant.helpers.config_entry_oauth2_flow: debug
    google_nest_sdm: debug
    google_nest_sdm.device: debug
    google_nest_sdm.device_manager: debug
    google_nest_sdm.google_nest_subscriber: debug
    google_nest_sdm.event: debug
- It is recommended to let Home Assistant create the Pub/Sub subscription for you. However, if you would like more control you can enter a
subscriber_idin the configuration. See Subscribe to Events for more instructions on how to manually create a subscription and use the full subscription name in the Home Assistant configuration e.g.projects/gcp-project-name/subscriptions/subscription-id
Works With Nest API
The Legacy Works with Nest API is deprecated, and will be shut down by Google in September 2023.